| Version 92 (modified by , 15 years ago) ( diff ) |
|---|
Ariba Overlay Multicast VLC Plugin - Overlay-based Videostreaming using Ariba and MCPO Application-Layer Multicast

What is the AribaMC plugin?
The AribaMC plugin is an Open Source streaming module for the VLC media player. It enables video streaming through the overlay-based virtual network substrate Ariba in combination with the MCPO application-layer multicast protocol. With AribaMC you can deliver video streams to groups of users, similar to IP Multicast, but without any need of in-network multicast support. Also, through the use of Ariba, AribaMC can cope with several protocol issues such as IPv4/IPv6 transitions, Network Address Translation (NAT), mobility, and many more networking problems in a self-organized and distributed manner.
For more information about Ariba, MCPO, or the SpoVNet project, please refer to: http://www.ariba-underlay.org , http://www.spovnet.de
Setting up / installing
1.0.6 --> Ubuntu 10.04 LTS 1.1.4 --> Ubuntu 10.10 1.1.5 --> aktuelle VLC version, aber nicht std. in Ubuntu
32 bit 64 bit
xxxxxxxxxxxxxxxxxxxxxxxxxxxxxxxxxxxxxxxxxx
The ariba framework is currently available for Linux, therefor, the plugin is also Linux-based. As soon as further platforms are available it will be announced here.
A quick and simple way for testing and using the plugin (besides compilation) is the use of precompiled libraries, which we provide. In this section we describe how to set up an Ubuntu 9.10 or 10.04 for this purpose. This should be adoptable to other Linux distributions easily. Instructions how to compile the plugin are provided in the Developers Guide below.
For running the AribaMC plugin a number of packages are required on the target system. Your might need different boost versions, use what's coming with your distribution. Log4cxx is this version or higher required.
sudo apt-get install vlc
sudo apt-get install libboost-system1.40.0
sudo apt-get install libboost-thread1.40.0
sudo apt-get install libboost-regex1.40.0
sudo apt-get install liblog4cxx10
Please download the tar-ball containing the Ariba and the plugin libraries:
32bit linux: [ coming soon ]
64bit linux: [ coming soon ]
xxxxxxxxxxxxxxxxxxxxxxxxxxxxxxxxxxxxxxxx
Unpack the archive to e.g. $HOME. You will find two folders aribalibs and vlclibs. Set the LD_LIBRARY_PATH to aribalibs:
set LD_LIBRARY_PATH=$LD_LIBRARY_PATH:/home/user/aribalibs
and run VLC with
vlc --plugin-path=/home/user/vlclibs
A first test:
Now it's time for a first simple test.
Run two instances of the modified vlc-players. At best, use two different machines as there are some connection problems with Ariba when running two instances on the same machine
To follow the instructions here, you can switch the language to English:
LANG=en_US.UTF-8 vlc --plugin-path=/home/user/vlclibs
When you now have two vlc-windows let's continue, we'll call them [S] and [R].

- Receiver side [R]
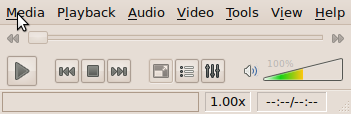
- On [R] please click: Media > Open Network Stream...
- Then choose: Protocol: »AribaMC« (Note: If you can only see protocols like: HTTP, HTTPS, UDP, etc but no »AribaMC« then the plugin wasn't loaded correctly into your vlc. Please refer to the trouble shooting section in this case.)
- The address field should now look like this:
1234:localhost:5000
- Press »play«.
- On [R] please click: Media > Open Network Stream...

- Server side [S]
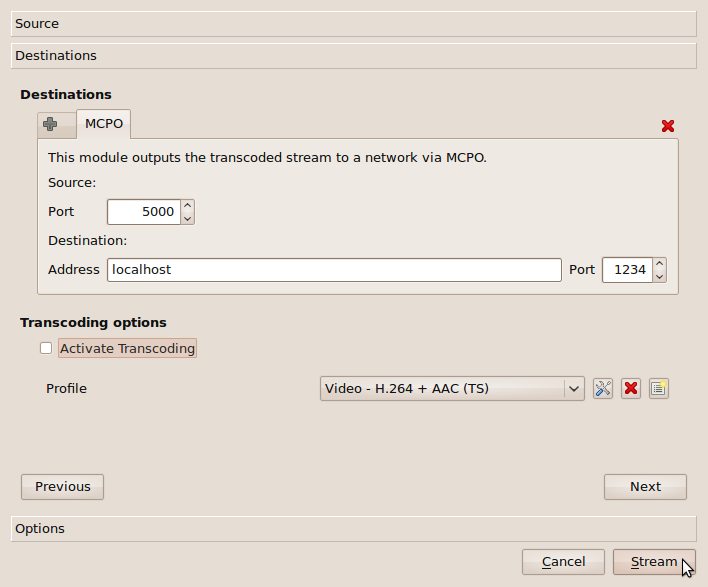
- On [S], click: Media > Streaming...
- Add a video file. (For a first test we recommend the test-video [coming soon], or at least a video you're successfully able to stream via UDP. Just eliminate sources of error not connected to the AribaMC plugin.)
- Press »Stream«.
- Press »Next«.
- Choose »AribaMC« our of the list and press »Add«.
- Now you can see: Source: Port: 5000; Destination: Address: localhost, Port: 1234
- Disable transcoding and press »Stream«.
- After a few seconds you should see the video in [R].
- On [S], click: Media > Streaming...

Usage
In this section we describe the parameters of the AribaMC plugin and some usage scenarios which demonstrate the strength of the AribaMC plugin approach.
AribaMC uses a Spontaneous Virtual Network (SpoVNet) for distributing the video content. Each SpoVNet have to consist of 0-1 senders and 0-N receivers. The connection procedure does not depend on the role (sender/receiver) one instance has. This can confuse a little in the beginning, as on most streaming protocols the role defines whether one instance is client or server.
Parameters
The AribaMC plugin takes three connection parameters in the GUI:
SourcePort:DestinationAddress:DestinationPort (e.g. 1234:localhost:5000)
The SourcePort provides an entry point for other instances to the SpoVNet our instance is in (or will be in). To access this entry point DestinationAddress and DestinationPort must be set on the IP address (or domain name) and SourcePort of an instance in the targeted SpoVNet. An instance which has not connected to such an entry point makes up a SpoVNet with only itself in it.
While the GUI only provides limited configuration capabilities, you can use a configuration file that allows for more fine-grained configuration. The configuration file can only be loaded when using VLC with the command line. Setting the configuration file is currently different on sender and receiver side. For setting the config file of the sender use
vlc --plugin-path=/home/user/vlclibs --sout-aribamc-config-file ./config.txt
and for the receiver side use
vlc --plugin-path=/home/user/vlclibs --config-file ./config.txt
The configuration file can hold several parameters, the main documentation is here. To achieve the same effect as in the GUI use:
ariba.endpoints = tcp{5003}
ariba.bootstrap.hints=mcpovlc{ip{127.0.0.1};tcp{5002}}
The first is the local server socket port, the second is the bootstrap information for the remote IP and port. Note, that you can only use hostnames in the GUI, the settings file requires IP addresses. In the settings you can use furthermore IPv6 addresses, RFCOMM, and automatic bootstrap modules.
We currently have three automatic bootstrap modules that help to join the network without giving any IP/port information:
- broadcast - A periodic broadcasting protocol using IPv4 and IPv6
- mdns - Multicast DNS using the Avahi library
- sdp - Bluetooth service discovery protocol
If you are running on a LAN, you can e.g. use the following in the settings
ariba.bootstrap.hints=mcpovlc{bootstrap}
for running the automatic broadcast based bootstrapping module. Note, that a client does only broadcast its bootstrap information if the module is enabled, and can only receive the information if the module is enabled. Just using it on one machine does not make sense, you have to use it on multiple machines.
To view further parameters of the AribaMC plugin do:
./vlc -p aribamc
which outputs
VLC media player 1.0.6 Goldeneye

 MCPO input (aribamc)
      --caching <integer>        Caching value in ms
      --config-file <string>     ariba config file

 MCPO stream output (aribamc)
      --sout-aribamc-caching <integer>
                                 Caching value (ms)
      --sout-aribamc-config-file <string>
                                 ariba config file
Creating a SpoVNet
At first we need an initial SpoVNet, consisting of a single AribaMC instance. This instance can either be server or client but must be accessible from (at least) the second instance. (Means, it mustn't be blocked by a firewall or NAT.) On the first instance we have to set the SourcePort. DestinationAddress and -Port can be set but as long as there is no other instance listening there, setting this parameters has no effect.
On the second instance, DestinationAddress and -Port must be set adequate. It can also set the SourcePort to act as an entry point later.
A third instance can either use the first instance or the second one as an entry point. (Given that both are accessible and have their SourcePort set.)
Et cetera.
Note: In the current implementation the sender begins the transmission immediately when it's ready. Using the sender as initial node may result in missing the beginning of the transmission.
Examples / Scenarios
    192.168.1.1              192.168.1.2
       _____                    _____
      |  1. |                  |  2. |
      |_____|  ------>------   |_____|
      \______\                 \______\

        5000:             1234:192.168.1.1:5000
    192.168.1.1              192.168.1.2
       _____                    _____
      |  2. |                  |  1. |
      |_____|  ------>------   |_____|
      \______\                 \______\

 5000:192.168.1.1:1234           1234:
    192.168.1.1              192.168.1.2
       _____                    _____
      |  1. |                  |  2. |
      |_____|  -->--+--->---   |_____|
      \______\       \         \______\
                      \
        5000:          V   1234:192.168.1.1:5000
                        \
                         \
                     192.168.1.3
                        _____
                       |  3. |
                       |_____|
                       \______\

                 1234:192.168.1.2:1234
  192.168.1.100                 192.168.178.100
       _____    »           «      _____
      |  3. |   »           «     |  2. |
      |_____|  -»->--+--->--«--   |_____|
      \______\  »     \     «     \______\
                »      \    «
5000:141.3.70.130:1234  V      1234:141.3.70.130:1234
                         \
                          \
                      141.3.70.130
                         _____
                        |  1. |
                        |_____|
                        \______\

                          1234:
Legend:

   IP-Address
      _____
     | Nr. |  (These Numbers describe
     |_____|    the start-up order of the instances.)
     \______\

  Parameter string


Video stream direction:
--------- > ---------


Firewall:
   »
   »
   »
   »
   »
Trouble shooting
Developer Guide
The Developer Guide describes how to compile VLC and the AribaMC plugin, and how to insert the plugin's code into an existing VLC code.
Compile Ariba & MCPO
In order to compile the AribaMC plugin, you have to install Ariba and MCPO first. By following the instructions below, you compile and install them to $HOME/local in your home-directory. Further information are provided on the official Ariba-Installation page (http://ariba-underlay.org/wiki/BaseInstall).
On ubuntu 9.10 / 10.04 the following packages are necessary:
- build-essential
- libtool
- autoconf
- automake
- libgmp3-dev
- liblog4cxx10-dev
- libboost-thread-dev
- libboost-system-dev
- libboost-regex-dev
sudo apt-get install build-essential libtool autoconf automake libgmp3-dev liblog4cxx10-dev libboost-thread-dev libboost-system-dev libboost-regex-dev
Get the Ariba and MCPO sourcecode from the download section
* in the "ariba"-directory do:
   ./bootstrap
   ./configure --prefix=$HOME/local
   make install

* get the MCPO sourcecode
* in the "mcpo"-directory do:
   ./bootstrap
   ./configure --prefix=$HOME/local LDFLAGS=-L$HOME/local/lib CPPFLAGS=-I$HOME/local/include
   make install
Getting the plugin code
The source code package contains a modified vlc-1.0.6 including the AribaMC sender code, the receive code and the gui modifications. If you want to compile a vlc-1.0.6 (same version as in the ubuntu 10.04 repository) you can continue reading the compile the modified VLC section.
The following instructions help to insert the plugin code into an existing vlc source (e.g. from a different version than 1.0.6):
Input and Output Modules
- Get the vlc source code you intend to modify.
- Insert the following folders from "our" source code:
- vlc/modules/access/aribamc
- vlc/modules/access_output/aribamc
- Activate the new folders by adjusting the following files. (You can make a {{diff}}} with our version of these files to see the changes.):
- vlc/configure.ac
- vlc/access/Modules.am
- vlc/access_output/Modules.am
Note: The file vlc/modules/access_output/aribamc/mcpo.c is based on vlc/modules/access_output/udp.c. You might to consider this, if you work on this code.
GUI support
For AribaMC-Gui support please adjust the following files. You can see the changes by making a diff between your version of these files and the original ones.
- vlc/modules/gui/qt4/dialogs/sout.cpp
- vlc/modules/gui/qt4/components/open_panels.cpp
- vlc/modules/gui/qt4/components/open_panels.hpp
- vlc/modules/gui/qt4/components/sout/sout_widgets.cpp
- vlc/modules/gui/qt4/components/sout/sout_widgets.hpp
Logging Level
Probably you want to set the ariba logging output to "info":
* on vlc/modules/access/aribamc/McpoModule.cpp edit line 24
    from:
      logger->setLevel(log4cxx::Level::getWarn());
    to:
      logger->setLevel(log4cxx::Level::getInfo());

* Equally on vlc/modules/access_output/aribamc/McpoModule.cpp line 30.
Compile the modified VLC
Before you start, please install the vlc build-dependencies. On Ubuntu you can get all the dependencies via:
sudo apt-get build-dep vlc
Then prepare the code by running
./bootstrap
and
./configure
with suitable parameters.
If you have a version of VLC already installed, you can get it's configure parameters via: vlc --version --verbose=2
We recommend the following configure line:
export LD_LIBRARY_PATH=$LD_LIBRARY_PATH:$HOME/local
./configure --prefix="$HOME/local" '--build=i486-linux-gnu' '--disable-update-check' '--enable-fast-install' '--enable-release' '--with-binary-version=1ubuntu1.1' '--disable-atmo' '--disable-fluidsynth' '--disable-gnomevfs' '--disable-kate' '--disable-mtp' '--enable-x264' '--disable-zvbi' '--enable-a52' '--enable-aa' '--enable-bonjour' '--enable-caca' '--enable-dca' '--enable-dvb' '--enable-dvbpsi' '--enable-dvdnav' '--enable-faad' '--enable-flac' '--enable-freetype' '--enable-fribidi' '--enable-ggi' '--enable-gnutls' '--enable-jack' '--enable-libass' '--enable-libmpeg2' '--enable-lirc' '--enable-live555' '--enable-mad' '--enable-mkv' '--enable-mod' '--disable-mozilla' '--enable-mpc' '--enable-ncurses' '--enable-notify' '--enable-ogg' '--enable-pulse' '--enable-qt4' '--enable-realrtsp' '--enable-sdl' '--enable-shout' '--enable-skins2' '--enable-smb' '--enable-speex' '--enable-svg' '--enable-taglib' '--enable-telx' '--enable-theora' '--enable-twolame' '--enable-vcd' '--enable-vcdx' '--enable-vorbis' '--enable-alsa' '--enable-pvr' '--enable-v4l' '--enable-v4l2' '--enable-svgalib' 'build_alias=i486-linux-gnu' 'CFLAGS=-I${HOME}/local/include -g -O2' 'LDFLAGS=-L${HOME}/local/lib -Wl,--as-needed' 'CPPFLAGS=-I${HOME}/local/include' 'CXXFLAGS=-g -O2' LIBS="-L${HOME}/local/lib -lariba -lmcpo"
Having the code successfully configured, compile VLC via:
make
and install it via:
make install
For further instructions about compiling VLC please have at look at: http://wiki.videolan.org/UnixCompile
Note! Compiling on ubuntu requires the specification of the "--prefix" option. For a system wide installation use "--prefix=/usr"
Attachments (4)
- Open_Media.png (23.1 KB ) - added by 16 years ago.
- Stream_Output.png (40.1 KB ) - added by 16 years ago.
- VLC_media_player.png (11.7 KB ) - added by 16 years ago.
- logotest.png (6.5 KB ) - added by 16 years ago.
Download all attachments as: .zip